Creating Your First AppJS App with Custom Chrome
AppJS is no longer being updated or maintained. For a similar platform, check out node-webkit which is backed by Intel Open Source and is consistently being improved and updated. I’ll write a new tutorial for node-webkit sometime in the future. Also, despite the legacy name, node-webkit uses Chromium as its base, so it is now using the Blink rendering engine.
Over the past few months, I’ve been studying up and trying out several cross-platform development solutions and one of the more interesting ones I’ve found, as a web designer and developer, is AppJS. It allows development for the desktop for all three major desktop operating systems using the mix of technologies commonly known as HTML5 and node.js.
Of course, I’ve also been using Adobe AIR since it was introduced, though AIR for HTML isn’t all that great in my experience. AppJS, on the other hand, uses the Chromium Embedded Framework which renders content beautifully, is super fast and has all of the latest and greatest features HTML5 has to offer without awkward workarounds.
Before getting started, it is worth mentioning that AppJS is still a relatively new project and documentation is sparse at the moment, but it is being worked on. I’m also not attempting to compile and package a completed app just yet, so I will be using the distributable version and replacing the content files throughout this tutorial.
Downloading and Extracting AppJS
Visit the AppJS website and choose the correct version of the distributable for your operating system. Once the download is complete, extract the ZIP file to a location of your choosing. I am using a local web server to test my app in the browser as well as in AppJS, so I’ve extracted mine to the home directory for the web server.
The main files associated with an app in the distributable package are:
app.exe(for Windows, not sure of the naming on other OSes, but it should be similar) – This is the launcher for your app. Double click it to start node and your app with its initial window.data/app.js– This is the main JavaScript file for the application. It is responsible for the connection to node.js and the native operating system. You can set options for your initial window in this file./data/contentDirectory – This is where your app’s main content will live. You can create subdirectories to organize your content as you see fit./data/content/index.html– This is the content for your initial AppJS window. We will be editing this file to create our custom chrome and application content./data/content/style.css– Your app’s main stylesheet.
Editing the App’s Content
data/app.js
As mentioned above, the app.js file controls the initial window for your app, and since we want custom chrome, some options will need to be changed. For custom chrome, the system default window chrome needs to be hidden, so in the window variable, inside the call to app.createWindow, change showChrome to false (or add it if needed… it’s just a standard JavaScript object).
Next, we need the web browser’s standard background to be transparent and hidden away (otherwise you’ll just get a white window with no transparency). To enable this in the window, set or add the alpha option inside of app.createWindow to true.
Once those two changes are made, your app is set up to use custom chrome. For ease of use, here is what my app.js file looks like:
var app = module.exports = require('appjs');

app.serveFilesFrom(__dirname + '/content');

var window = app.createWindow({
  width  : 1024,
  height : 768,
  icons  : __dirname + '/content/icons',
  showChrome : false,
  alpha: true,
  autoResize: false,
  resizable: true,
  margin: 0

  /***************************** defaults ********************************
* url            : 'http://appjs', // serve static file root and routers
* autoResize     : false,          // resizes in response to html content
* showChrome     : true,           // show border and title bar
* resizable      : false,          // control if users can resize window
* disableSecurity: true,           // allow cross origin requests
* opacity        : 1,              // flat percent opacity for window
* alpha          : false,          // per-pixel alpha blended (Win & Mac)
* fullscreen     : false,          // client area covers whole screen
* left           : -1,             // centered by default
* top            : -1,             // centered by default
*************************************************************************/

});

window.on('create', function(){
  console.log("Window Created");
  window.frame.show();
  window.frame.center();
});

window.on('ready', function(){
  console.log("Window Ready");
  window.require = require;
  window.process = process;
  window.module = module;

  function F12(e){ return e.keyIdentifier === 'F12' }
  function Command_Option_J(e){ return e.keyCode === 74 && e.metaKey && e.altKey }

  window.addEventListener('keydown', function(e){
    if (F12(e) || Command_Option_J(e)) {
      window.frame.openDevTools();
    }

  });

  this.dispatchEvent(new this.Event('app-ready'));
});

window.on('close', function(){
  console.log("Window Closed");
});Code language: JavaScript (javascript)
I’ve also added an event called app-ready that will be seen by the main window once the app has finished loading. This will be important later.
If you launch the app, it should launch without any of the default chrome of the OS. To exit, you’ll need to right click on your taskbar (for Windows) and choose Close Window. Or, if you’re adventurous and want to use JavaScript to close the app, press F12 or Command+Shift+J on your keyboard and in the Chrome console, use:
window.close();Code language: JavaScript (javascript)data/content/style.css
Inside of style.css, the body of the app needs to be set to be transparent as well or you’ll continue to have an opaque window. The quickest and easiest way to set this up is to paste the following into the stylesheet:
body{
   margin: 0;
   padding: 0;
   background: transparent;
}Code language: CSS (css)
Of course, you could edit the existing rule to include the same properties as well. For me, I want a fresh start, so that is the only declaration in my stylesheet for now.
data/content/index.html
Now it’s time to actually build the window’s custom chrome and app’s content. I always start by either deleting the entire index.html file and recreating it or deleting the content in the body tag. Before beginning to add elements, I also link up my stylesheet and any JavaScript libraries I know I’ll be using. For the tutorial, I’ve added jQuery which I’ve placed in a subdirectory called libs inside of the content folder. I also like to prototype in a single file, so I’ve added an extra style element and a script element for when the document is ready. When the time comes, if necessary, these elements can be moved to external files later in the project.
<!doctype html>
<html>
<head>
<meta http-equiv="Content-Type" content="text/html; charset=utf-8" />

<title>AppJS Project</title>
<link rel="stylesheet" href="style.css">
<script src="libs/jquery-1.8.2.min.js"></script>

<style>

</style>
<script>
$(function(){

});
</script>
</head>

<body>

</body>
</html>Code language: HTML, XML (xml)
The Basic Window
Now to build the actual window itself. You can use any HTML and CSS that you’d like to build your window. I use a basic structure that has a wrapper for the entire app window, a title bar, a body/content section for the app itself and then finally a status bar (sometimes). For the sake of simplicity, I also just use div elements. You can use any valid HTML5 elements you wish.
...

<div class="app">
	<div class="title-bar">
		<!-- Title Bar Elements go here... -->
	</div><!--.title-bar-->
	<div class="app-content">
		<!-- App content goes here... -->
	</div><!--.app-body-->
	<div class="status-bar">
		<!-- Status Bar elements are here... -->
	</div><!--.status-bar-->
</div><!--.app-->

...Code language: HTML, XML (xml)
The Title Bar
A basic title bar has three main elements: the title of the app, an icon and window controls. Again, to create these, use any HTML you’d like. Also, start to think cross-platform at this point. Windows users will expect the window controls to be on the right while Mac OS users will expect them on the left. Titles are also placed in different places depending on the operating system. To be able to move these around later, I use simple containers to hold the things that will change positions.
For the final HTML inside the .title-bar div:
<div class="title-drag"></div>
<div class="app-title">
	<span class="app-icon"></span><!--.app-icon-->
	<span class="text"></span>
</div><!--.app-title-->
<span class="button-container window-controls">
	<ul class="inline">
		<li><a class="button minimize-button" href="#minimize-app">Minimize</a></li>
		<li><a class="button maximize-button" href="#maximize-app">Maximize</a></li>
		<li><a class="button close-button" href="#close-app">Close</a></li>
	</ul>
</span><!--.window-controls-->
<span class="button-container fullscreen-button-container">
	<a class="button fullscreen-button" href="#fullscreen-app">Full Screen</a>
</span>Code language: HTML, XML (xml)
I added an extra div with a class of title-drag for a bit later. For the Mac side, I’ve also added an extra button that can be used to launch the app into a fullscreen experience.
If you were to run the app now, you would not be impressed. You’d see a floating blue list of links that do nothing except hover on a transparent background over your screen.
Here’s the final HTML for our app:
<!doctype html>
<html>
<head>
<meta http-equiv="Content-Type" content="text/html; charset=utf-8" />

<title>AppJS Project</title>
<link rel="stylesheet" href="style.css">
<script src="libs/jquery.js"></script>

<style>

</style>
<script>
$(function(){

});
</script>

</head>

<body>

<div class="app">
	<div class="title-bar">
		<!-- Title Bar Elements go here... -->
		<div class="title-drag"></div>
		<span class="app-icon"></span><!--.app-icon-->
		<span class="app-title"></span><!--.app-title-->
		<span class="button-container window-controls">
			<ul class="inline">
				<li><a class="button minimize-button" href="#minimize-app">Minimize</a></li>
				<li><a class="button maximize-button" href="#maximize-app">Maximize</a></li>
				<li><a class="button close-button" href="#close-app">Close</a></li>
			</ul>
		</span><!--.window-controls-->
		<span class="button-container fullscreen-button-container">
			<a class="button fullscreen-button" href="#fullscreen-app">Full Screen</a>
		</span>
	</div><!--.title-bar-->
	<div class="app-content">
		<!-- App content goes here... -->
	</div><!--.app-body-->
	<div class="status-bar">
		<!-- Status Bar elements are here... -->
	</div><!--.status-bar-->
</div><!--.app-->

</body>
</html>Code language: HTML, XML (xml)
Dressing the Window
With the title bar elements in place, our window is ready to be dressed with some CSS and brought to life using JavaScript. This is the part where you can unleash your creativity to make your app’s window look however you want. For the tutorial, I’ve kept it relatively simple with plain buttons and no icons. Since you have the WebKit engine for rendering, you can use CSS gradients, SVG, box-shadow, border-radius, canvas, regular background images, border-image, and whatever else you’d like to style your window. I’ve even seen mention of Flash content being deployed in AppJS – is that even possible? – so, if that works, you can use it too.
After styling, here’s what my window looks like… all 8 variations for different operating systems and versions:
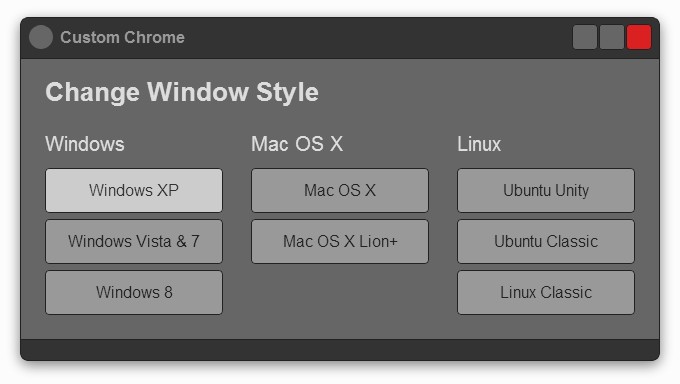

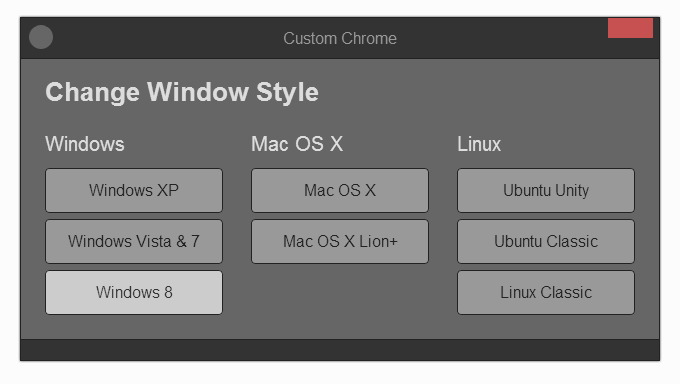
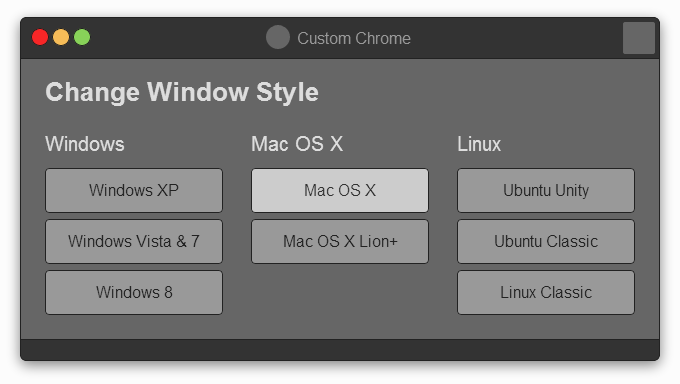
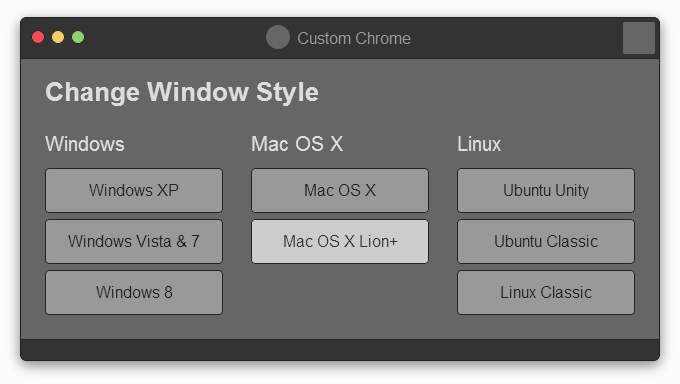
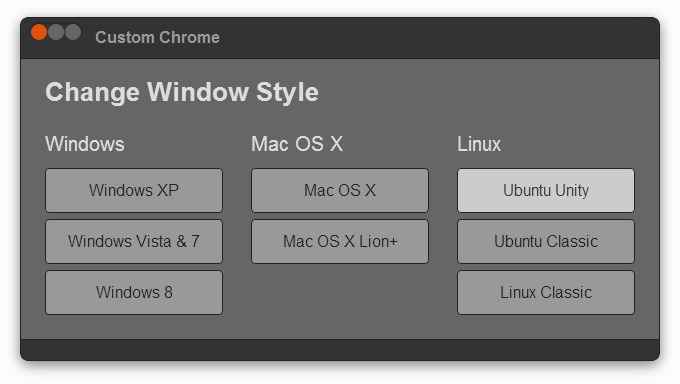
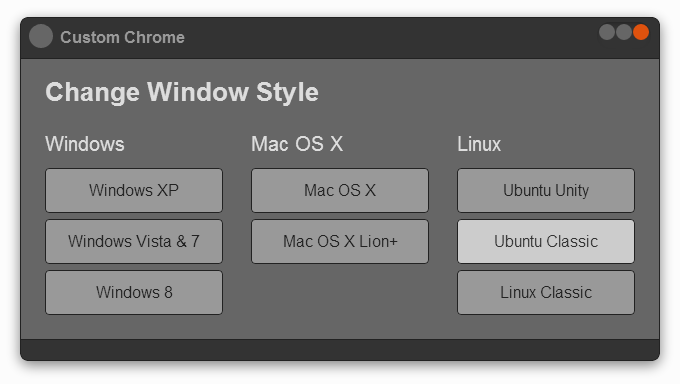
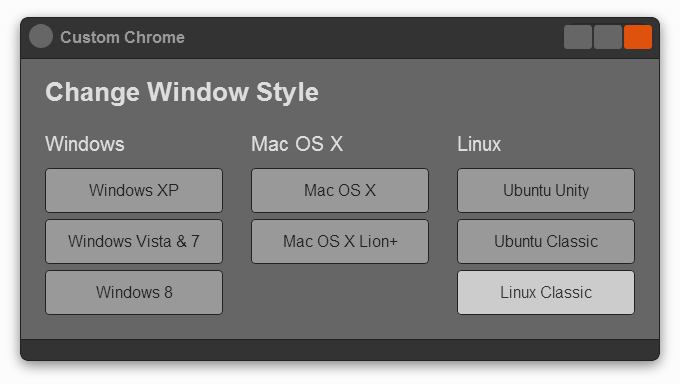
Without going into the gritty details of all of the CSS, I used basic box model techniques, floats, the new flexible box model and every other trick in the book that you’d use on a normal website to style and position the controls in the title bar. The Windows controls use normal floats and absolute positioning while the Mac OS and Linux variations use absolute positioning, flex boxes and the order property to reorder the buttons appropriately for the platforms.
Styles switch simply by adding and removing classes on to the body tag of the app. Just imagine using a single CSS class to switch around all of the required buttons in dialog boxes later in your project!
I didn’t add any symbols for the demonstration which kills the usability of the Windows 8 style. In a real application, of course it would be a good idea to include the proper icons.
Here is the full CSS for the example windows (including maximized and fullscreen states and simple styling for the little bit of app content):
The Window Shadow…
When using custom chrome, you lose the OS default window shadow, which is a bummer because it can’t really be faked to perfectly match the system. They are possible to create in this layout, though, with just a simple box-shadow around the .app div element. To make it show, add some padding to the body element to match the size of the shadow. It takes a little experimentation to get it right. Also keep in mind that the padding will affect any media queries you plan to use for your app’s content since your visible window will not be the same size as the real window that is being queried.
Aside from not matching the OS shadow, the padding required on the body element also has a drawback. Unlike Adobe AIR which allows click through to underlying applications and the desktop environment in transparent areas of the window/stage, AppJS will capture all mouse events on the transparent areas. This isn’t specifically the fault of AppJS though. From my understanding Chromium doesn’t have the mechanisms in place for it to happen. Because of this, the smaller the shadow, and thus the body padding, is, the better. The Windows 8 style shadow is a perfect example, though it could still be a little darker and larger.
A Note on Maximize and Full Screen
Since this windowing experiment is basically a window within a window and has a drop shadow which requires padding on the body element, when maximizing the window or going full screen, the actual transparent window that holds our HTML-created window will be scaled appropriately, but our custom window retains the shadow and padding… and border-radii. This leads to a really weird looking maximized or full screen app window.
To fix that, when going into the maximized or fullscreen state, another class is added to the body and new CSS takes over to remove the shadow, the padding and the various instances of border-radius that keep the window from occupying the full space of the real app window.
Note: At the time of writing, AppJS has a bug in the Windows implementation that causes maximized windows using custom chrome to cover the taskbar. For the moment, maximize and fullscreen do essentially the same thing.
Wiring it all Together
Up until this point, our AppJS window is basically just a pretty picture rendered by WebKit. To make it interactive, we’ll use a bit of JavaScript to call the AppJS functions that will allow us to control the window. The functions we’ll be using are listed in the AppJS docs at Github.
The Main Window Controls
We’ll start with the minimize and close buttons because they are easy and only require a single click handler each. For both, select the button with jQuery (or plain, vanilla JavaScript, or any other library loaded in your app) then add a call to the correct functions from window and window.frame in AppJS.
$('.title-bar .close-button').on('click', function(event){window.close();});
$('.title-bar .minimize-button').on('click', function(event){window.frame.minimize();});Code language: JavaScript (javascript)
Next, the maximize and fullscreen button are a little more complicated because they are more like toggle buttons than the single-click minimize and close buttons that hide the window when clicked. For these, I use a couple of helper functions that set up the toggle action (these are very similar and could probably be combined into a single function with a little thinking time.
//Helper function with logic to toggle the action of the maximize
//button between maximize and restore.
var maximizeWindow = function(event){
	switch(window.frame.state){
		case 'maximized' :
			window.frame.restore();
			$(document.body).removeClass('maximized');
		break;

		case 'normal' :
			window.frame.maximize();
			$(document.body).addClass('maximized');
		break;
	};
};

//Helper function with logic to toggle the action of the fullscreen
//button between fullscreen and restore.
var fullscreenWindow = function(event){
	switch(window.frame.state){
		case 'fullscreen' :
			window.frame.restore();
			$(document.body).removeClass('fullscreen');
		break;

		case 'normal' :
			window.frame.fullscreen();
			$(document.body).addClass('fullscreen');
		break;
	};
};

$('.title-bar .maximize-button').on('click', function(event){maximizeWindow(event)});
$('.title-bar .fullscreen-button').on('click', function(event){fullscreenWindow(event)});Code language: JavaScript (javascript)
These final function calls are almost identical to those used for minimizing and maximizing, except they call the helper functions which figure out which action to take and ultimately call on window.frame to complete the task.
The Title Bar as a Drag Handle
The final interaction our custom window needs is a little bit of movement, specifically being able to move the window around the screen by dragging the title bar. As of the time of writing, AppJS only supports this action on Windows and Mac OS X according to the docs, but as the framework matures, it should be the same for all platforms.
To accomplish the moving, simply listen for mousedown on the title bar or an element in the title bar (in this case, I’ll be using the extra title-drag div from the original code of the title bar) and calling window.frame.drag() from AppJS.
$('.title-drag').on('mousedown', function(event){window.frame.drag();});Code language: JavaScript (javascript)And with that, our window can be placed anywhere on the screen simply by dragging the title bar as one would expect.
A Few Small Details
So far, even though our window is fully functioning, it is missing a couple of small details. First, it has no title. The original HTML already has a place for the title text, so we’ll just fill it in with a little JavaScript that pulls the title text of the HTML page into the title bar’s .app-title .text element. This could also be hard-coded into the HTML, but the JavaScript approach leaves a little flexibility and shows how to change the window title if needed later.
$('.app-title .text').text(document.title);Code language: JavaScript (javascript)With adding the title text, which is selectable by default, the drag action used to move the window could be interrupted if the user initiates the dragging over the text (if you’ve just attached the event to the title bar element itself, that is). In this example, the problem is already fixed with the addition of the .title-drag div element. Through its CSS properties, it covers the title and makes the text unselectable. It accomplishes this using absolute positioning and the z-index property to make sure the .title-drag element is above the .app-title div in the z stacking order.
Next, because some of the CSS used for floating and aligning buttons on the Windows Vista and 7 variation causes the buttons to overlap, if the traditional Windows glow is added to the buttons on hover with a simple box-shadow, the glow may be obstructed by the other buttons. Luckily, this is easily fixed with another small bit of JavaScript.
$('.window-controls .button')
  .on('mouseover', function(event){
    $(this).css('z-index', 2);}
  )
  .on('mouseout', function(event){
    $(this).css('z-index', 0);}
  );Code language: JavaScript (javascript)
All this does is manipulate the z-index property of the buttons on hover so that the currently hovered button is always higher in the stacking order. As a result, if the button has a glow or other effect, it will always render on top of the other buttons. I’ve used mouseover and mouseout events, but in jQuery, the hover event could also be used.
Of note, for this z-index trick to work, the position property of the buttons must be set to either absolute or relative. Default positioning does not allow reordering by using the z-index property.
Finishing Up
With a fully functioning custom window, the only thing left is to add your app’s content to the .app-content div. Again, since WebKit is powering the rendering, you can use any and all techniques you would normally use in a browser-based app to produce the app content. With AppJS, you can also reach out to the native side using node.js to do things that would normally not be possible in a web app. For this example app, I just added a few buttons to change the window style using plain jQuery, but the sky is the limit. Can’t wait to see what you all build!
Here is the final app, with code:
Update
I’ve broken the code for this tutorial into files and organized Starter for AppJS on Github. Extract the downloaded repository into your already extracted copy of the AppJS distributable package of your choice for everything needed for a custom chrome app.
11/07/2012 – Updated Starter for AppJS with new minor styling, including removal of the window shadow, and merged a patch by Simon Horton to include compatibility with his new AppJS packaging solution.